


Google Analytics is a powerful tool to help you track and understand your blog traffic. It’s easy to set up Google Analytics 4 on WordPress and this post will walk you through the steps you need.
This post includes affiliate links. If you make a purchase using an affiliate link I may get a few bucks, at no extra cost to you. As an Amazon Associate I earn from qualifying purchases. To learn more, read the Affiliate Disclosure.
Updated March 25, 2022
What is Google Analytics?
Google Analytics is a powerful free tool that gathers data about the traffic to your website. The data is then offered in numerous graphs and reports you can filter and view in the ways you choose.
Google Analytics helps you track your blog’s growth as you create new content, work on your marketing and promotion and improve your SEO. You can see where your visitors comes from, what actions they take on your blog site, which posts get the most traffic and engagement and plenty more.
If you’re interested in working with brands, ad networks and affiliate partners, they’ll be interested in your stats. Google Analytics is the industry standard and the most reliable source of accurate traffic data.
Google Analytics is a powerful tool and it’s easy to set up on WordPress with the steps below.
Google Analytics News
Google announced that it will officially retire Universal Analytics on July 1, 2023. That means, the only option will be to use Google Analytics 4. Your Universal Analytics (UA) data won’t migrate over, making it imperative that you set up GA4 now, so you can start building up data in your GA4 property that you’ll use for years to come.
What can Google Analytics tell you?
With Google Analytics you can track, analyze and evaluate data related to visits to your blog. You’ll know the who, what, when and where of your traffic.
Are you getting traffic from Facebook? What about Pinterest? Are your SEO efforts paying off with good organic search traffic? What’s your most popular post? Google Analytics will answer all of these questions for you, and more.
- User Behavior data tells you how long a visitor stays on your site. It also shows what page(s) they entered and exited from, what pages they viewed and what they clicked on.
- Audience Interests include the demographics (age and gender) of your website’s visitors. You can find out what type of content is most popular and gets the most engagement.
- Acquisition data clues you in on how people find your site. These channels include organic search, referrals, and social media.
- Conversions indicate actions visitors take on your site. For example, how many people are clicking on certain links or subscribing to your list.
While there are other search engines including Bing and Yahoo, the vast majority of your search engine traffic is going to come through Google. It makes sense, therefore, to take advantage of this free and powerful source of data.

Don’t make the same mistake I did
I hate to admit it, but I made a pretty huge mistake with my first couple of websites, which were online for years. First off, I didn’t set up Google Analytics the first few years of my online career. Then once I finally did, I didn’t pay much attention to it.
I also didn’t pay much attention to SEO (search engine optimization) either. My primary source of income from my website was services (WordPress design and coaching programs) and most of those clients came from word of mouth referrals. I published blog posts, built a list and maintained a social media presence, but I didn’t think about keyword research. I didn’t create my posts in a way that helped me draw new clients via search engines.
Had I put Google Analytics in place from the start, and spent some time learning SEO, my traffic and income would have been far greater. It’s a mistake I’ll never make again, and I strongly recommend you learn from my biggest mistake too.
Follow the easy steps below to get Google Analytics set up now on your WordPress blog to track your traffic. And do not ignore SEO. Get started learning asap and always be improving.
Have a look at my Best Resources for Bloggers for SEO courses and eBook recommendations you can start off with right away.
Start a Blog the Right Way: 7 Easy Steps
If you are just getting started with your blog, or you’ve been working on a free hosted system like Wix, Squarespace or WordPress.com, get started with a self-hosted WordPress site now.
Going self-hosted is the way to get access to an entire library of powerful plugins, endless customizations and loads of monetization options.
With a self-hosted site you’ll improve your SEO too. Choose a web hosting provider, install WordPress in one click (it’s free) and choose a theme to get started.
Read Start a Blog the Right Way in 2022: Easy Guide and I’ll walk you through every step to get started. Then come back here to set up your Google Analytics account.
The steps below are for a self-hosted WordPress website.
How to Set Up a Google Analytics Account
It’s clear that using Google Analytics is going to hook you up with every bit of information you need to track and analyze what’s working on your website. As powerful and important as it is, it’s easier than you may think to get it set up.
Step 1: Start for free or sign in to Google Analytics
Start by going to googleanalytics.com. Click on the button “Start for free”. If you already have an account, you can open the menu and click “Sign in to Analytics”.
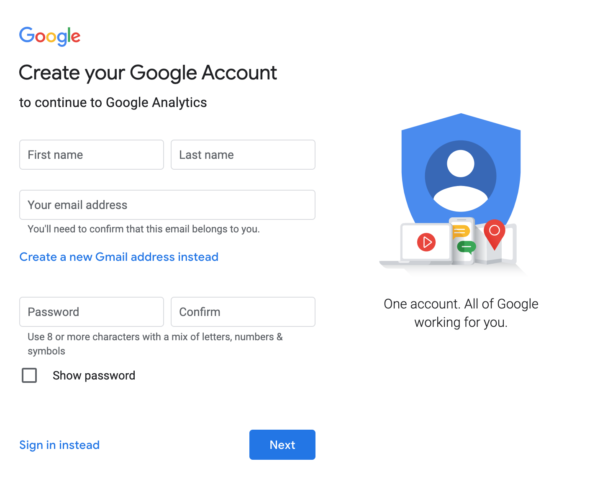
When you click “Start for free” it will prompt you to sign in if you have an account, but if you’re new click on “Create account”. Enter your name, email address and create a strong password.
The next generation of Google Analytics
As of October 2020, Google introduced the next generation of Google Analytics known as Google Analytics 4 (GA4). The older version is now called Universal Analytics (aka GA3) and the tracking code begins with UA-. Both versions are still supported, for now.
However, Universal Analytics, aka UA, aka GA3, will stop processing data on July 1, 2023. That means it time to get started with GA4, or make the switch from UA.
Step 2: Set up a property and data stream in Google Analytics
A property represents your blog/website, and is the collection point in Google Analytics for the data from your site.
Following from Step 1 above, enter a name for the property (you can have up to 100 properties in one account) and select reporting time zone and currency.
Click Next, then select your industry category (choose the one that best describes your niche) and business size.
Click Create then review and accept the terms.
Click Add Data Stream and then click Web.
Enter the URL of your website (ex, yourwebsite.com) and a Stream name (ex, “Web Stream”).
Google recommends you enable enhanced measurement, and later you can individually disable enhanced measurement events you don’t want to collect.
Click Create Stream.
If you already have a Google Analytics account, but need to add a property, start by clicking Admin in the bottom left corner. In the Property column, click Create New Property and then follow the instructions above.
How to Add Google Analytics to Your WordPress Website
Now that you have your Google Analytics account set up, you need to copy the tracking code and add it to your website so everything is tracked.
You need only choose ONE method to add your Google Analytics tracking code. In fact, be very careful not to add it more than once. It’s an error some new bloggers made, and will of course mess up your data results.
Step 3: How to find your Tracking Code in Google Analytics 4
First, you’ll need to copy your measurement ID (GA4). While logged in at googleanalytics.com, click the Admin gear in the lower left-hand corner.
Then under the Property column in the center, for GA4, click Data Streams under Property column. Under Tagging Instructions, click on Global Site Tag.
Click on the copy icon on the upper right of the box, to copy the entire site tag code.
Next, you’ll add the tag to your website, in Step 4 below.
If you’re starting from scratch, an alternative to the above instructions you might instead go under the Property column, select GA4 Setup Assistant, and then click Get Started under “I want to create a new Google Analytics 4 property.” Follow the set up wizard from there.
Use the best plugin to add Google Analytics 4 tag to WordPress
There’s a very simple, light, and free plugin called Insert Headers & Footers that does nothing more than let you add code to your header and footer without any complications. It’s the only plugin you need to set up Google Analytics 4 on your WordPress site.
Instructions for adding your code with the Insert Headers & Footers plugin is in Step 4 below.
A word about Jetpack and other analytics plugins
It’s tempting, but not recommended, to rely on Site Stats from Jetpack. The WordPress plugin, Jetpack, boasts numerous features, including site analytics. However, Jetpack often counts your own visits to your site, as well as bots, thus making the stats wildly inaccurate. It’s also a very heavy plugin known to create speed issues.
There’s a better way to do pretty much everything Jetpack does. You’ll find some far superior replacement plugins in my Resource Guide.
There’s a complicated plugin called Monster Insights which can slow down your site, and isn’t as accurate as the source.
Other plugins worth mentioning are Site Kit by Google and GA Google Analytics by Jeff Starr. Site Kit gathers data from multiple Google services right into your WordPress dashboard. Sounds good, but the plugin gets mixed reviews.
On the one hand, it’s by Google so that’s the most direct link between Google Analytics data and your WordPress blog. However, many users report speed problems and crashes when using it. Others recommend it, so it may be worth a look.
The plugin called GA Google Analytics is simpler than Site Kit, and has a 5 star rating. It makes it easy to add your tracking code to your site. It also brings the data into your WordPress dashboard, which is convenient. However, convenience often sacrifices speed, and the more plugins you have the more potential points of vulnerability you have.
Do your own research and make your choice. I added my code with Insert Headers & Footers and I view and analyze my data at googleanalytics.com. There’s also a free Google Analytics app for your phone that gives you easy-to-read data graphs.
Step 4: How to set up Google Analytics 4 on your WordPress blog with the Insert Headers & Footers plugin
Follow these simple steps to add the new plugin, copy the code you need and add it to your website:
- From your WordPress dashboard, click on Plugins and Add New
- Search for and install and activate the Insert Headers & Footers plugin
- From your Google Analytics account, copy your property’s global site tag (see above)
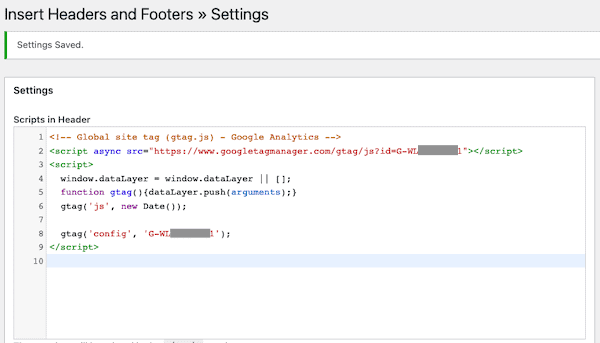
- Under Settings in your WordPress dashboard, choose the “Insert Headers…” plugin to open it
- Now simply paste your Google Analytics tag script into the “Scripts in Header” box
- Scroll down to click the Save button
Here’s how it will look when you’re done pasting your gtag into the plugin:
Other options for adding Google Analytics to WordPress
There are other methods you can use to add the gtag to your website. I personally use the Insert Headers and Footers plugin, and have never had any issues with it.
This article goes over 4 Easy Ways to Add Google Analytics to WordPress, including using Google Tag Manager and syncing locally. I haven’t used either method so I’ll leave it to them to explain it, should you want to research these alternative options.
If you’re just getting started on WordPress and Google Analytics, keep it simple and follow my steps above to open your GA account and add the tag with the free Insert Headers & Footers plugin.
Filtering Out Your Own Traffic in Google Analytics
Regardless of which option you use to add your Google Analytics tag to your WordPress site, don’t forget one more important step. You must create a filter to exclude your own visits to your website from your data results.
Every visit to your website is recorded by Google Analytics 4, and that will include your own. It’s important to keep an eye on your site, preview your posts and pages, and see how things look on different devices.
It’s also important to have accurate data about traffic to your site, especially when your numbers are still low and you’re working on growth. Luckily, it’s easy to create a filter that excludes your own visits to your blog.
Step 5: How to filter out your own traffic in Google Analytics
Follow these instructions on how to filter out internal traffic in GA4.
You can see that excluding traffic from your home IP address is easy enough. But there are a few things to keep in mind.
Filter to exclude additional IPs if necessary
Your IP address changes from time to time, so you should put a note in your blogging planner or calendar to check your IP at least every six months and update the filter in Google Analytics when necessary.
If you often visit your blog from a favorite coffee shop, co-working space or even a friend’s house, you’ll want to add filters for those IP addresses too. It’s not necessary if you check a page or two every once in a while. It’s worth doing though if you work on your blog frequently from those locations.
While you’re there, Google “what’s my IP” and follow the same steps above to create additional filters with the address.
Check that the filter is working by visiting a page or post, and then checking Realtime data in Google Analytics to see if it shows you as a visitor at your location.
If you still have low traffic, it will be obvious if it’s you. If you get good traffic, you’ll want to open a deep page or post that’s rarely visited to test the filter. There can be a delay of up to 30 minutes before Realtime data will reflect the change.
Learn more about how to use Google Analytics
That’s it. You’ve now set up your WordPress website with Google Analytics, and created a filter to exclude your IP address. You will now have an enormous amount of data recorded every minute of every day.
There’s so much you can learn about your blog through your Google Analytics reports and graphs.
OK, now what are you supposed to do with all this information?
First of all, you don’t have to understand it all right away. Some of the data won’t be terribly meaningful to you in the beginning. You may only wish to check your sessions and pageviews for now, and later you’ll evaluate deeper for other metrics that matter to you.
I recommend this quick eBook, Google Analytics Easy as 123 by Debbie Gartner, to learn what you need to know to put all that Google Analytics data to good use to grow your traffic.
It’s an affordable and easy 60 pages that will guide you to the data you need without getting lost in all the rest.
If you’re looking for an eCourse on this topic, check out Tracie Fobes’ Blog Analytics.
Learn more about SEO to get more traffic to your blog
In addition to Google Analytics Easy as 123, Debbie Gartner also offers the Ultimate SEO Bundle of eBooks.
I learned a lot from Eb Gargano’s SEO Jumpstart eCourse. From tips on setting up the free Yoast for SEO plugin properly to keyword research training, this course is a great fit for beginner and intermediate bloggers new to SEO.
More Posts You’ll Love
- Quickly Find Blog Post Ideas for Beginners
- Set Clear Blogging Goals to Make 2022 a Success
- Start a Blog the Right Way in 2022: Easy Guide
- 15 Elements of a Great Blog Post + Free Blog Post Template
- The Genius Blogger’s Toolkit (Is it Worth the Money?)
Free Blog Post Template

Heather Cottrell is a single mom blogger, business coach and marketing professional. She started her first business and blog in 2005 as a health coach, and years later evolved into a WordPress web designer and business coach for women wellness coaches. In 2020 Heather launched Single Mom Bloggers to help stressed moms create freedom with a blog or business to make money working from home. Learn more about Heather Cottrell.