Are you ready to start a money making blog? Get started the right way from day one with a self-hosted WordPress website on Bluehost. Follow these 7 easy steps and you’ll be up and running fast!
This post includes affiliate links. If you make a purchase using an affiliate link I may get a few bucks, at no extra cost to you. As an Amazon Associate I earn from qualifying purchases. To learn more, read the Affiliate Disclosure.
Get Started Blogging with WordPress and Bluehost in 7 Easy Steps
One way for a mom to make money working from home in 2025 is to start a blog, either as a side hustle or as a strategy to earn a full-time income by self-employment.
Being your own boss allows you the freedom to create the schedule your family needs and make money on your own terms. Being your own boss means you decide your health insurance provider, your vacation days and your sick day policy. It can be the perfect fit for single mom life.
Besides being super affordable, even on a single mom budget, Bluehost includes a free domain name with your hosting account. They make it easy to install WordPress, and you can monetize with affiliate marketing or ad networks.
To start a blog or build a business, get started with WordPress and Bluehost in 7 easy steps:
- Open Your Bluehost Account
- Choose a Hosting Plan
- Enter or Create a Domain Name
- Enter Personal Information and Payment
- Create a Password
- Change Nameservers (if applicable)
- Install WordPress
Bonus: if you complete these 7 steps and want to keep going right away, keep scrolling to find Steps 8-15 as well as a great course recommendation for beginning mom bloggers!
- Get Started Blogging with WordPress and Bluehost in 7 Easy Steps
- Save Yourself Time, Money and Frustration
- Get Started with WordPress and Bluehost
- Step 1: Open Your Bluehost Account
- Step 2: Choose a Hosting Plan
- Step 3: Enter or Create a Domain Name
- Step 4: Enter Personal Information and Payment
- Step 5: Create a Password
- Step 6: Change Nameservers
- Step 7: Install WordPress on Bluehost
- Congratulations on Your New WordPress Website!
- Step 8: Choose a Theme and Optional Page Builder
- Step 9: Install WordPress Plugins for Security, Backups, SEO and More
- Step 10: Publish Your Main Pages and Make Your Site Legal
- Step 11: Begin Creating Great Content
- Step 12: Use Marketing and SEO to Bring Traffic to Your Site
- Step 13: Begin Building a List with Email Marketing
- Step 14: Get Ready to Monetize Your Blog from the Start
- Step 15: Create Great Content Consistently
- Blog by Number Course (Perfect Next Step for You!)
- Get Support to Succeed with Your New Business
Save Yourself Time, Money and Frustration
Build a self-hosted WordPress website that will support your blog or online business for many years to come.
Why Choose WordPress
Sites like Wix, Weebly, Blogger and Squarespace are fine for fun, or as a temporary placeholder as you’re starting out. If you are only blogging as a hobby, and have no interest in making money, you might choose one of these sites. I can’t recommend any of them though.
I don’t recommend a WordPress.com website either, as they are just as limited. It’s important to note that WordPress.com differs from WordPress.org, the powerful self-hosted version I recommend.
This can be confusing and one of the most common mistakes bloggers make when they’re starting out.
If you’re serious, and committed to starting a blog that makes money, build a professional self-hosted WordPress website from the start.
A self-hosted WordPress website offers far better SEO results and unlimited customization possibilities. You’ll have access to a greater collection of plugins to secure, monetize and upgrade your website, than the hosted sites offer.
Those free hosted sites limit your growth, your creativity and your reach. They’re not the right choice for a success-driven blogger or business builder.
Why Choose Bluehost
I’ve hosted countless websites with Bluehost for well over 10 years and I always feel good recommending them. They’re a solid company with excellent customer service.

Below are just a few of the many reasons why Bluehost is a great choice:
- Bluehost is one of only three hosting companies WordPress recommends
Powering over 2 million websites, Bluehost offers the ultimate WordPress platform. Tuned for WordPress, we offer WordPress-centric dashboards and tools along with 1-click installation, a FREE domain name, email, FTP, and more. Easily scalable and backed by legendary 24/7 support by in-house WordPress experts.
WordPress.org
- Premium customer service, reliability and usability
- Easy-to-use control panel
- Custom-built servers to provide the most stable and reliable hosting environment
- Start quickly with one-click WordPress install
- Expert technical support available by phone email and live chat
- Domain name included FREE with hosting
- SSL certificate included FREE with hosting
- Hosting with Bluehost allows you to monetize your website
This WordPress blog is hosted by Bluehost, and all of the client websites I built are WordPress websites hosted on Bluehost.
Alternatives to Bluehost
Though I haven’t used them myself, many bloggers I know and trust recommend SiteGround and NameHero for web hosting. If you want to do your own research, I recommend you take a look at both Bluehost and NameHero.
Again, I’ve hosted with Bluehost for over 10 years, and I’m still with them. They’re great for the serious beginner, as well as NameHero. You really can’t go wrong with either choice.
If you’re a go big or go home kinda gal, then have a look at BigScoots. They’re great for the bigger blogs with upwards of 100k pageviews/month.
On the other hand, I would strongly advise against Dreamhost, GoDaddy and HostGator. I’ve only experienced and heard horror stories from these hosts.
You’ll do better to get started with WordPress and Bluehost, from day one.
Where to Get a Domain Name
In addition to purchasing a hosting plan for your WordPress website, you need to choose a domain name. The domain name is like the address for your website. For example, my domain name is singlemombloggers.com.
You should choose a domain name that’s short and sweet, easy to remember and specific to your niche. Avoid silly spellings and using numbers in your domain name. It can take time to play around with different ideas before you land on the right name. You’ll find a free tool in Step 1 below where you can start searching for available names.
There’s no question that getting a domain name ending in .com is far superior to .net or any other suffix. If your website ends in anything but .com, you’ll be losing traffic. You’ll be in constant direct competition with the other website with the same domain that ends in .com.
Some website security experts recommend keeping your domain name and hosting with different companies. Personally, I’ve never had a problem with that. I’ve had domain names and hosting both from Bluehost. And I’ve also purchased domain names from GoDaddy (though I’d never use them for hosting).
Another choice for buying a domain name, if you don’t choose hosting with Bluehost, which includes the domain name for free, is Namecheap.
Read Best Resources for Bloggers (Including the FREE ones!)
Get Started with WordPress and Bluehost
You understand now why hosting a WordPress website with Bluehost is the very best way to build a business or start a blog, so let’s get started.
Before You Begin to Open a Bluehost Account
You’ll need your credit card, mailing address, phone number and email address to open a Bluehost account.
You also need to decide what domain name (e.g. mywebsite.com) you’re going to use. Either an existing domain name you already registered elsewhere, or something new. You’ll be able to try out some names to see if they’re available when you begin the account opening process below.
Step 1: Open Your Bluehost Account
If you don’t already have a domain name
Use the tool below to check and see if the domain name you want is available right now. Keep trying to find one that works and then click NEXT to begin setting up your Bluehost account with a free domain name and Basic Hosting.
If you already have a domain name
Go straight to Bluehost and then click on the green “Get Started” button.
Step 2: Choose a Hosting Plan
Assuming you’re just starting out, the Basic plan will be more than enough for your new blog or business. Later you may need to upgrade to Plus for additional storage space, or to Pro when you’re earning enough with your online business or blog.
However, if your business is already booming, you’re already a prolific blogger, or you intend to build more than one website, you’ll want to choose the Plus or Pro plan now.
Step 3: Enter or Create a Domain Name
Enter your existing domain name on the right or choose a new one on the left. Then click “Next”.
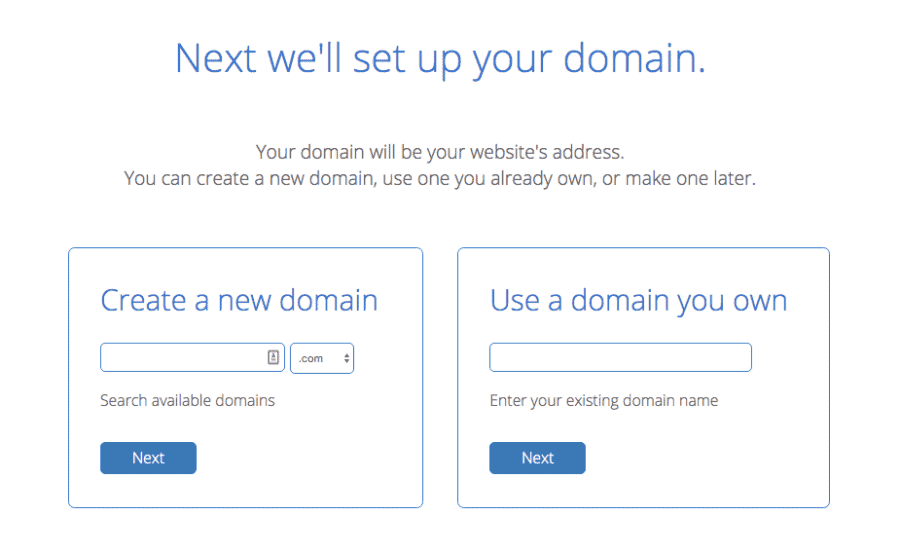
If you’re still deciding on a domain name, but want to begin building your website now, just click “I’ll create my domain later”. You’ll find the link below the boxes. When you’re ready, you’ll be able to update to a domain name you choose.
My domain name changed three times before I launched this blog. I contacted Bluehost by chat multiple times to help me get it done and they were great about it. However, I realize now I should have chosen “I’ll create my domain later” to save myself – and the awesome chat agents – the hassle of changing it three times!
So don’t hesitate to start without a domain name – you can come back to it when you’ve decided.
Step 4: Enter Personal Information and Payment
On the next screen, enter your personal details and credit card info.
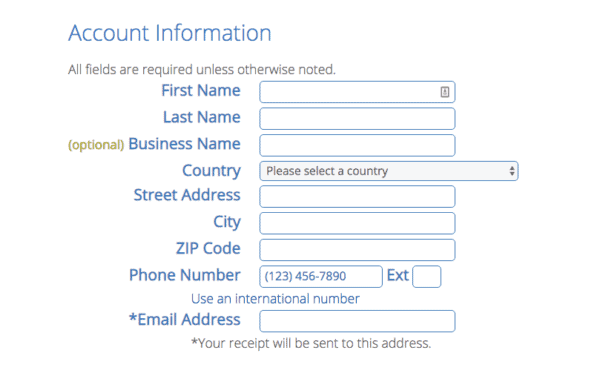
Account plans are billed annually, not monthly, and you can see the prices are lower for 2 or 3 years plans. I recommend choosing the 36 month plan for the best deal and to give yourself time to grow. Realistically, it takes more than a year to reach your income goals when you start a blog or build a business.
It’s entirely up to you which plan and features you choose, and I recommend the most basic package to get you started, so uncheck:
- Codeguard Basic
- Bluehost SEO Tools Start
- SiteLock Security – Essential
You can contact Bluehost to learn about each option, and you can always add on extra features later.
In my Best Resources for Bloggers Guide, you’ll find my favorite free plugins that will give you the security, backups and SEO tools you need.
Review the terms and agreements, check the box and click Submit.
Step 5: Create a Password
Choose a secure password with a mix of capital and lowercase letters, numbers and symbols.
Next, you will receive an email receipt from Bluehost, as well as other details including your login info.
Step 6: Change Nameservers
Skip to Step 7 if you chose a domain name with your Bluehost account.
If your domain name is registered with a company other than Bluehost, such as GoDaddy or Namecheap, you need to update the nameservers with your registrar to point your domain name to Bluehost.
Read the instructions for changing your nameservers to Bluehost by clicking here. Then choose the registrar you’ve used to purchase your domain name. This is very quick and easy to do.
If you selected a new domain name when you opened your Bluehost account above, you don’t need to change your nameservers. Your domain name is registered with Bluehost.
Step 7: Install WordPress on Bluehost
There is no better way to build your new website than with WordPress, and Bluehost makes it very easy to get started.
Once you create your password, Bluehost will walk you through the steps to install WordPress and begin building your website.

Congratulations on Your New WordPress Website!
It’s time to celebrate! You’ve completed the first most important piece of your blogger success journey.
From here, you’ll choose a theme, add images and begin creating great content for your very own, self-hosted WordPress blog.
If you’re ready to keep going now, keep reading for Steps 8-15 to get your blog launched.
Step 8: Choose a Theme and Optional Page Builder
There are so many WordPress themes to choose from and this a great way to get stuck and distracted for weeks, or months.
To keep it simple and move on quickly, I recommend the Astra theme. It’s free, easy to customize and very SEO friendly (it doesn’t slow your site down).
Many bloggers like using Elementor in addition to Astra, but I don’t. Elementor is a page builder, but some experts say it slows your site down. There are free and paid versions of both.
Instead I installed the free Ultimate Add-ons for Gutenberg (UAG) plugin, which provides extra blocks to choose from while you create pages and posts.
This site is built on the free Astra theme with extra blocks thanks to UAG.
Pro tip: What really makes your website come to life is great images and clear branding. No matter what theme you choose, customize it to make it your own. Use Canva to create a simple logo and check out my favorite stock media and graphic resources.
Step 9: Install WordPress Plugins for Security, Backups, SEO and More
Get set up on Google Analytics first and foremost. You’ll want that data as you grow, to find out where your traffic comes from, who’s visiting your site and what they engage with. It’s easy to get started with Google Analytics.
Read Easy Set Up for Google Analytics on WordPress
Now that you have your website started with WordPress and Bluehost, you’ll need a few powerful plugins. While logged into your WordPress site, click Plugins and Add New. You can use the keyword search area to find the plugins you need.
Even easier is to check out the plugins I use and recommend. Every plugin I use and recommend is included in my Best Resources for Bloggers Guide. Best part – most of them are free!
Go easy on plugins, though. Too many and you’ll slow your site down which makes for a poor user experience and bums out the search engines too. But there are absolutely great plugins that make your life easy and keep your blog running smoothly.
Step 10: Publish Your Main Pages and Make Your Site Legal
Start your blog by writing your About page and adding a Contact page.
Enroll in the free Legally Blogs Course and check out the essential Privacy Policy, Disclaimer, Disclosure and Terms & Conditions pages templates they offer. All created by a lawyer, specifically for bloggers.
The Legal Bundle Value Pack includes templates for all 4 legal pages your blog needs, plus easy-to-follow instructions. With this legal bundle, you’ll also have lifetime access to future versions.
Read Why Your Blog Needs the Legal Bundle Value Pack
Step 11: Begin Creating Great Content
Content is what your blog is all about. Know who you’re writing for, and create everything with her in mind. This is important! If you’re serious about blogging success and making money working from home as a mom blogger, then your blog is not about you.
Your blog’s content must solve a problem, fill a need or offer solutions to a specific group of people. This is your niche. Create for them, and you’ll do great!
Read Easy Guide to Choosing a Blogging Niche and Grab the Free Workbook
Niche Smarts for Bloggers Workbook
As a new blogger, it’s important to focus on writing. Creating content is the most important task for you as a new blogger, and getting into good habits around consistently creating new content will be the foundation for everything you do next.
Read How to Stay Focused as a New Blogger + Free Checklist
There are lots of ways to come up with new blog post ideas, and in the post below I share a helpful way for new bloggers to come up with blog post ideas.
The tips in this post work for either adding ideas to your content calendar – which you absolutely should have – and for when you’re feeling stuck and need an idea your next post.
Read Quickly Find Blog Post Ideas for Beginners
Unfortunately, a lot of new bloggers don’t put any thought into the user experience on their blog. They write in really long paragraphs, without any subheadings, bullet points or even images, to break up the text. They don’t think about SEO yet, and fail to include any call-to-action.
The post below and my Blog Post Template will help your blog look more professional from the start, and keep readers coming back for more.
Read 15 Elements of a Great Blog Post and grab my free Blog Post Template
Free Blog Post Template
Pro tip: You can launch and get started with your new WordPress site on Bluehost with just one post. Just make sure you have your main pages and then get it out there into the world. It takes months for Google to really notice your blog, so the earlier you go live, the better.
Step 12: Use Marketing and SEO to Bring Traffic to Your Site
Getting traffic to your site comes down to two primary methods: marketing and optimizing.
Marketing methods to grow traffic to your blog includes social media marketing. Join Facebook groups in your niche, join my Women in Wellness Marketing Group, and put TikTok and Instagram to work as well. Go where your ideal readers spends their time online.
Read Best Social Media for Bloggers to Grow Traffic and Make Money
Pinterest is a search engine that’s used to market your blog and bring traffic to your site. Depending on which niche your blog is in, you can start getting traffic quickly with Pinterest.
Read Get Easy Traffic with Pinterest Basics for Bloggers
Then there’s optimizing. This means learning and implementing good SEO practices to have your blog posts rank well on Google and other search engines. SEO is a long game. It doesn’t give you immediate results, but the results you will get are long-lasting, and better than anything social media will ever achieve.
I use and recommend the Yoast SEO free plugin, and the many free courses offered by Yoast Academy.
Also recommended, Debbie Gartner’s great Easy On-Page SEO ebook, or grab her SEO bundle.
Step 13: Begin Building a List with Email Marketing
It takes work to bring targeted traffic to your blog, which we covered in step 12. Once you get ideal readers to your blog, and they read your great content, they’ll want more.
Give your readers an easy way to connect with you by offering a free gift incentive that encourages them to share their email address.
Building a list is essential for bloggers. It’s your way to capture leads generated by your traffic strategies. Having your own list of interested readers protects you from the whims of social media.
Read Why Email Marketing for Bloggers Matters (and How to Start for Free) to learn more about what email marketing is and why it’s important for bloggers who want to grow and make money.
Some bloggers start building a list right away. Others wait and come back to it after they start getting traffic. If you choose to wait, mark your calendar to revisit this after 3 or 6 months if you haven’t started yet.
For ideas on what to send your subscribers, read What to Send Your Email List: Email Marketing Tips for Bloggers.
After six months of blogging, you should be building your list. I use and recommend ConvertKit which has a Free Trial offer, and a great Free Plan for new bloggers. To find out why I chose ConvertKit, and how it compares to other email marketing services, read Best Email Marketing Services for Bloggers.
Step 14: Get Ready to Monetize Your Blog from the Start
Yes, you can start monetizing now. Sure you need traffic, a decent following and an engaged list to make good money, but there’s no reason to wait to get started. It’s important to start implementing an affiliate marketing strategy early.
Get started with your WordPress site on Bluehost with a few great posts published, plus your legal pages in place, and you can start enrolling in affiliate networks.
Read Affiliate Marketing Basics for Bloggers
For mom bloggers in the parenting, kids or baby niche, read Best Affiliate Programs for Mom Bloggers
I’m not a huge fan of ads on blogs. I mean really, who is? I haven’t chosen to work with any ad networks yet, though I’ve looked at SheMedia, Monumetric and MediaVine.
If you’re interested in working with ads, I recommend waiting until you have good traffic, say 10K pageviews/month before applying. The low end ad networks you can get into with little traffic, such as Google AdSense, slow down your site, make for a terrible user experience and earn very little money. It’s really not worth it.
In order to get started with affiliate marketing or ad networks, you’ll need to have required legal pages in place. The Legal Bundle Value Pack is an affordable solution. It includes customizable templates for all 4 pages you need plus easy-to-follow instructions and lifetime access to future versions.
Focus on affiliate marketing to start, and then create products, like printables, courses and ebooks to sell digitally, or offer services.
Step 15: Create Great Content Consistently
Continue creating great content consistently. Niche specific content, published and promoted on a regular steady basis, is the key to success as a blogger.
Read Easy Guide to Choosing a Blogging Niche and Grab the Free Workbook
Read How to Stay Focused as a New Blogger + Free Checklist
Free Weekly Checklist
Blog by Number Course (Perfect Next Step for You!)
Now that you’ve got your WordPress blog started on Bluehost, there’s plenty more to learn! The steps above can guide you. And if you want to go deeper, a blogging course for beginners is the perfect next step for you.
Let me introduce you to the incredible Suzi Whitford of Start a Mom Blog. She is a highly successful blogger who has shown over 57,000 students how to start a blog with her popular Blog by Number Course.
It’s absolutely worth taking a look at if you’re serious about success. She’ll walk you through every step of growing your blog with videos, templates and bonus tools. It’s very well done, thorough and self-paced, and I am happy to recommend it to you!
Get Support to Succeed with Your New Business
You’re still with me, after 15 steps and a great course recommendation? Great job! I know you’re one seriously motivated single mom blogger!
And yes, I’ve got more where that came from. Just stick with me, cause I got your back 😉
If you haven’t already, get on my list for more tips, recommendations and resources.
If you’re a wellness blogger or coach, one-on-one support and personalized coaching may be a fit for you. Learn more about my popular Own Your Niche in 90 Days Program. I offer exclusive private, affordable coaching for bloggers and coaches in the wellness space, which may include well mind, body, spirit, home, relationships, parenting, etc. I’ve been business building and coaching since 2005, and I have a lot of experience to share to help you succeed.
One last thing: you got this! 💕
More Posts You’ll Love
- How to Start Blogging with a Full Time Job
- Set Clear Blogging Goals to Make Your Year a Success
- 15 Elements of a Great Blog Post + Free Blog Post Template
- How to Stay Focused as a New Blogger + Free Checklist
- 5 Real Moms Share 10 Best Tips to Successfully Work at Home with Kids
- Best Social Media for Bloggers to Grow Traffic and Make Money
- Why Your Blog Needs the Legal Bundle Value Pack
- Quickly Find Blog Post Ideas for Beginners
- Easy Set Up for Google Analytics on WordPress

Heather Cottrell is a single mom blogger, business coach and marketing professional. She started her first business and blog in 2005 as a health coach, and years later evolved into a WordPress web designer and business coach for women wellness coaches. In 2020 Heather launched Single Mom Bloggers to help stressed moms create freedom with a blog or business to make money working from home. Learn more about Heather Cottrell.



This is great! You’re right, using Bluehost is the best way I’ve found to go 👍🏼 Thank you for sharing this! 💯
Thank you! I’ve used them for over 10 years without issue, so I always recommend Bluehost!
Thank you very much for helping me.
You are very welcome! Good luck with your new blog!